本ページはプロモーションが含まれています
Xserver VPSを使ってLEMP環境を構築する方法を解説します。
一からOSを入れていっても良いのですが、Xserver VPSにはLEMP環境を簡単に構築できるアプリイメージが用意されていますので、今回はそちらを使用した方法を紹介します。
Xserver VPSのLEMPアプリイメージの構成
Xserver VPSのアプリイメージを使用した場合、LEMP環境は以下の構成になります。
| OS・ソフトウェア | バージョン |
|---|---|
| Ubuntu | 22.04 |
| Nginx | 1.18.0 |
| PHP | 8.1.2 |
| MySQL(MariaDB) | 10.6.12 |
ローカル環境で開発したアプリをデプロイする予定の方は適宜バージョンを変更したり環境設定を行う必要があります。
Xserver VPSにLEMP環境を構築する流れ
以下の流れに沿ってLEMP環境を作っていきます。
Xserver VPSをすでに契約している方は、VPSパネルの「OS再インストール」からLEMP環境をインストールしてから「LEMP環境の設定」を読んでください。
Xserver VPSに申し込む
Xserver VPSの契約がまだの方は以下の手順で申し込みができます。
【6月18日17:00まで】実質月額742円~!最大25%キャッシュバックキャンペーン
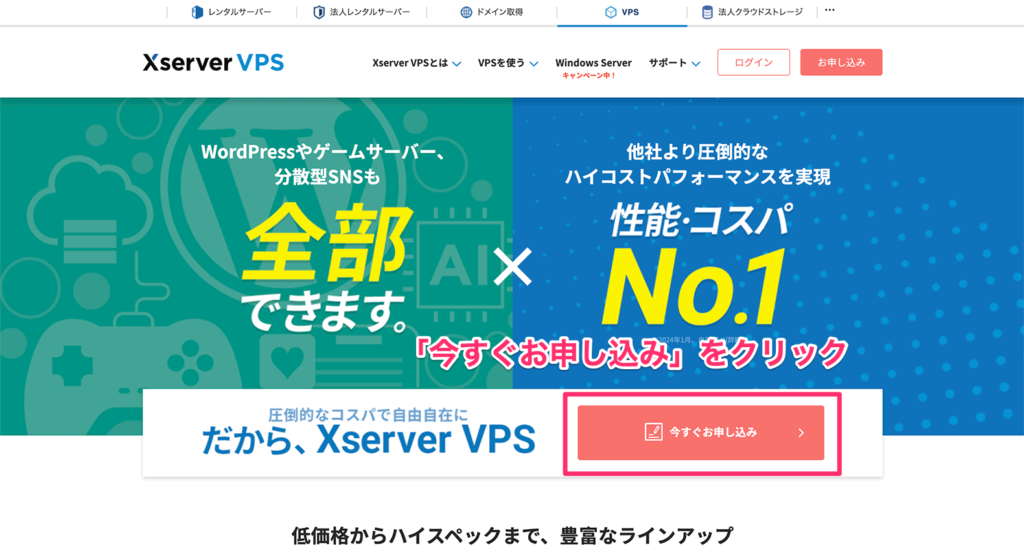
Xserver VPSの公式サイトはこちらまだXserver VPSを契約していない方は、Xserver VPSの公式サイトから申し込み手続きをします。
公式サイトの「お申し込みはこちら」をクリックしてください。
すでにXserverアカウントを持っている方は「ログイン」、初めて申し込む方は「すぐにスタート!新規お申込み」をクリックしてください。
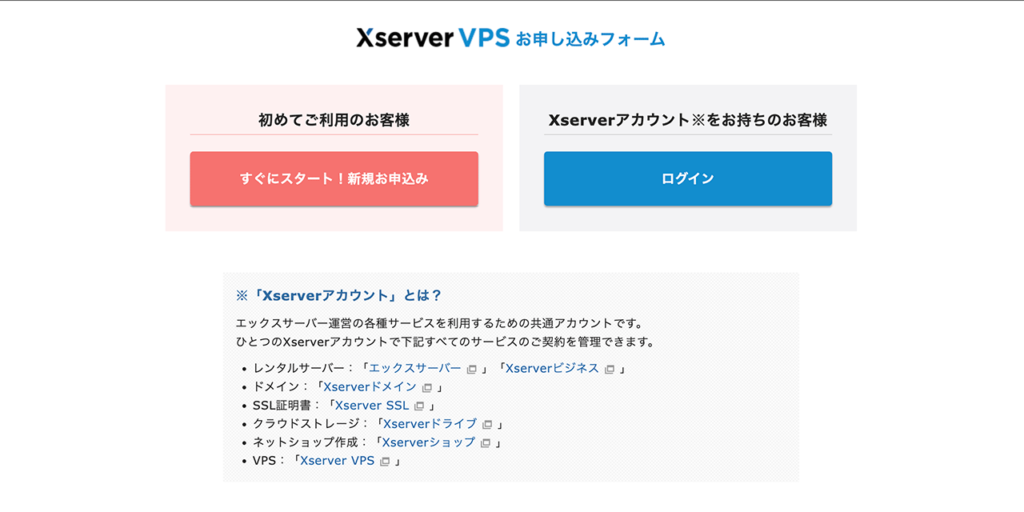
申し込みフォームが表示されます。
Xserverアカウントを作成するために、お客様情報を入力します。
必要項目を入力しましょう。
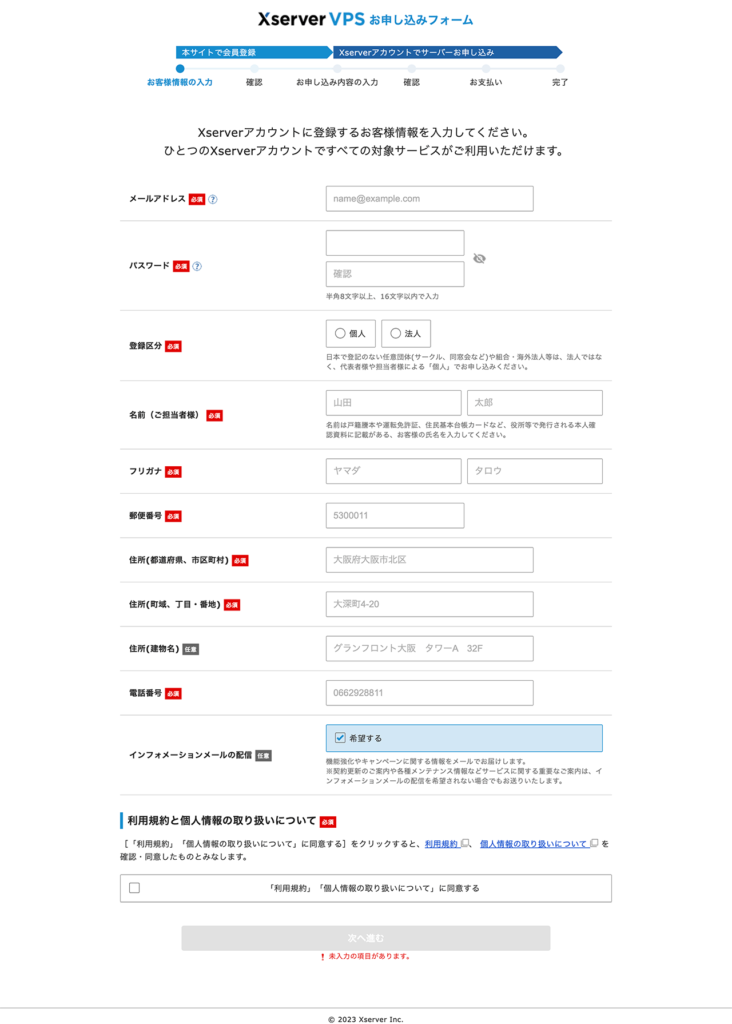
入力が完了したら、「次へ進む」をクリックしてください。
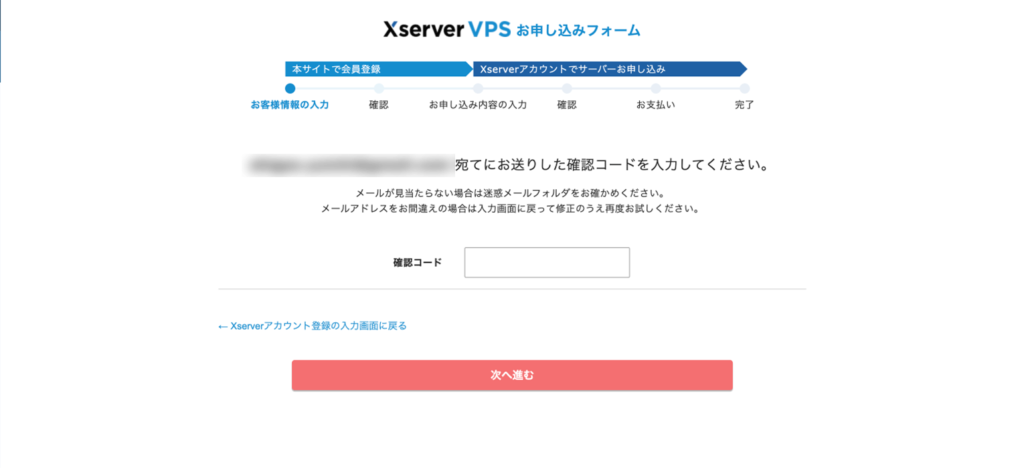
続いて、本人認証のために確認コードがメールで送られます。
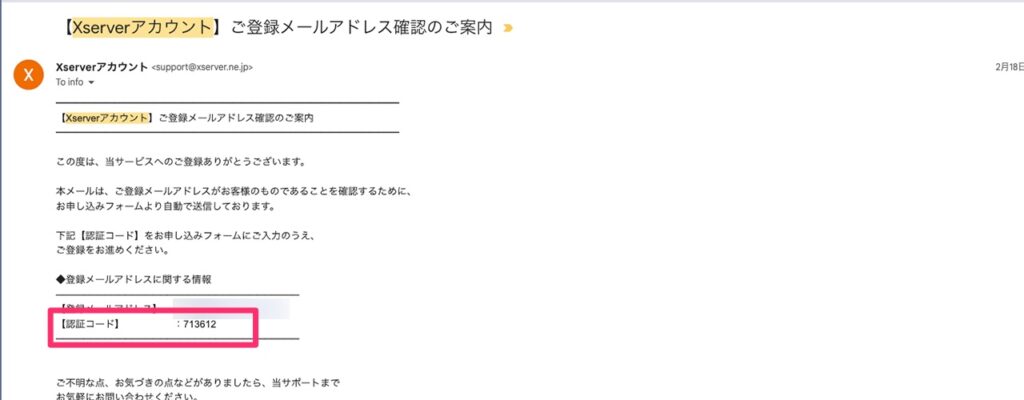
メールを確認して、確認コードを入力しましょう。
最後に入力内容を確認して、問題がなければ「この内容で登録しサーバー申し込みへ進む」をクリックします。
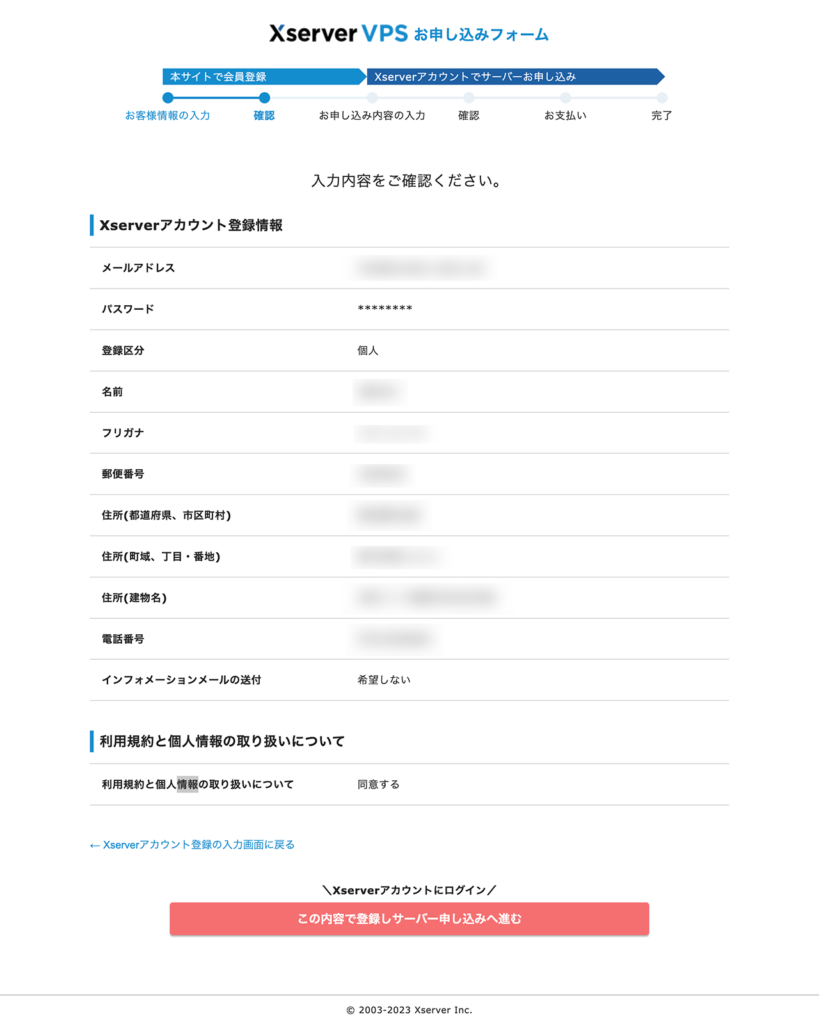
これでシン・アカウントの作成は完了です。
続いて、VPSの申し込みをします。
こちらも必要項目を入力していきます。
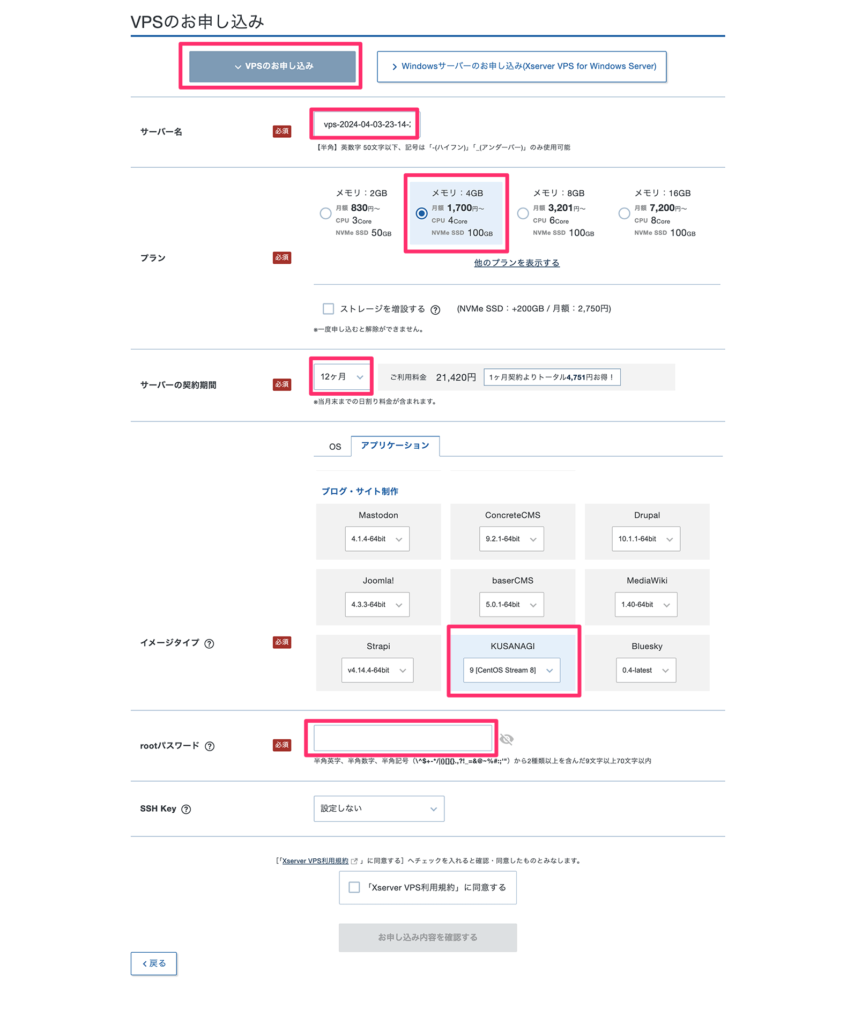
「イメージタイプ」には「LEMP」を選択してください。
入力が完了したら、「お申し込み内容を確認する」をクリックしてください。
確認画面で申し込み内容を確認します。
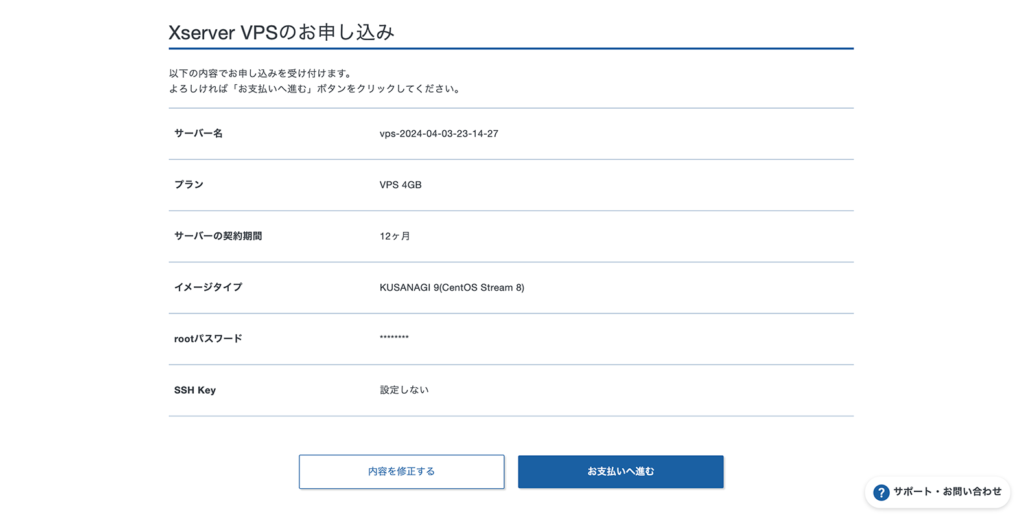
問題がなければ、「お支払いへ進む」をクリックしてください。
支払い設定を行います。
Xserver VPSではクレジットカード決済とあと払い(ペイディ)に対応しています。
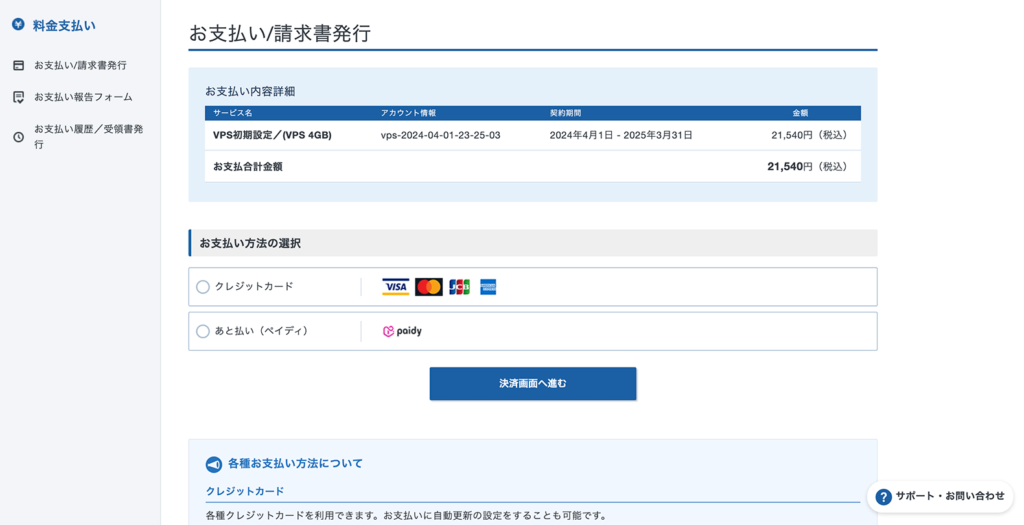
支払い方法を選択して、「決済画面へ進む」をクリックします。
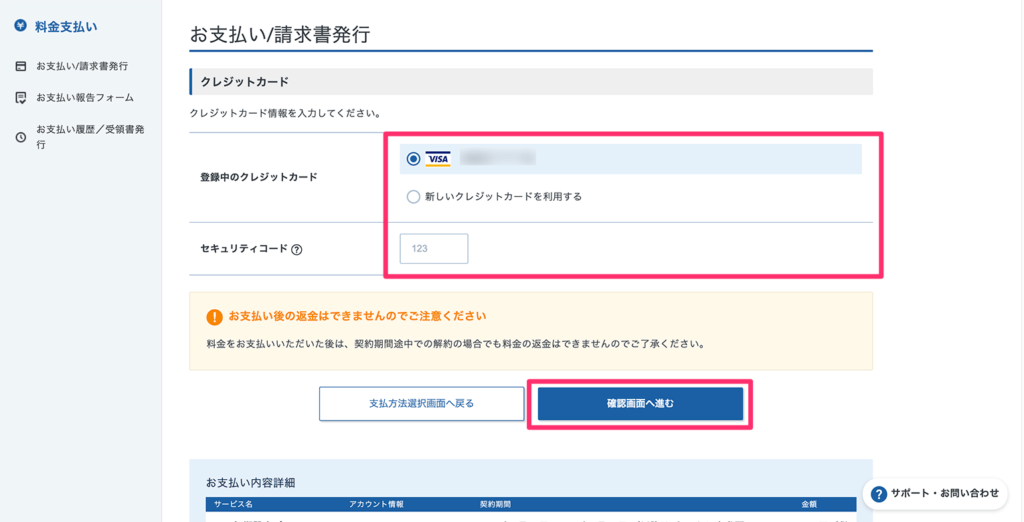
クレジットカード情報を入力して、「確認画面へ進む」をクリックしてください。
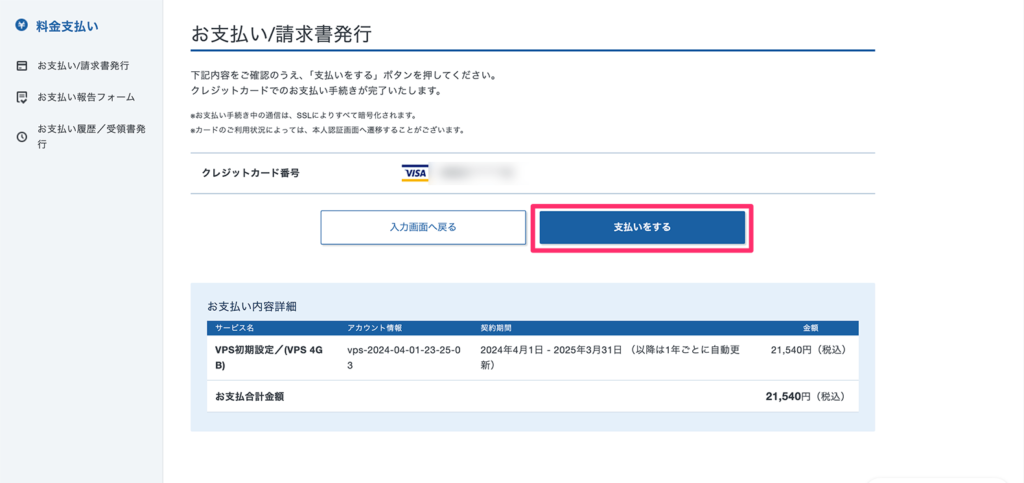
内容を確認して、問題がなければ「支払いをする」をクリックしてください。
これでXserver VPSの申し込みは完了です。
ポートの解放設定を行う
続いて、ポートの解放設定を行います。
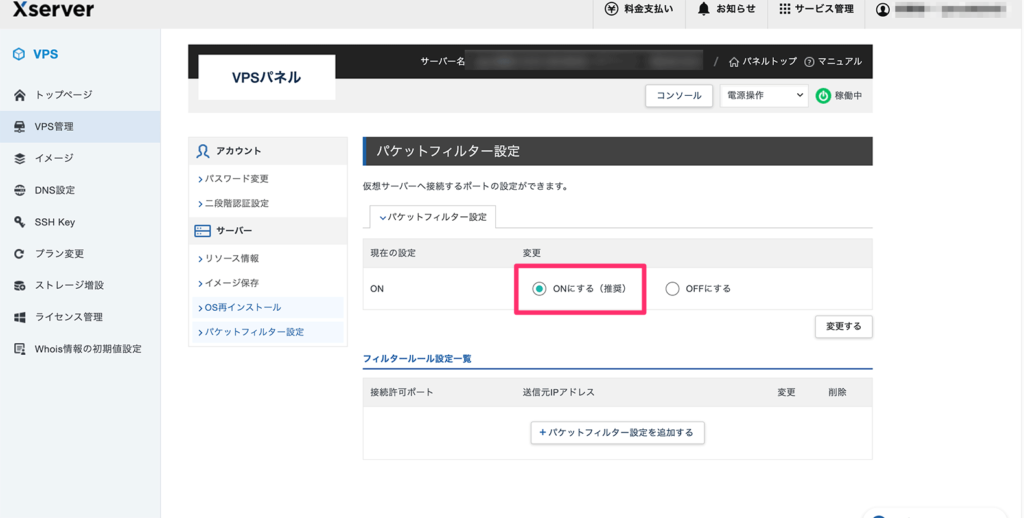
Xserver VPSではポートの解放設定をVPSパネルの「パケットフィルター設定」で行います。
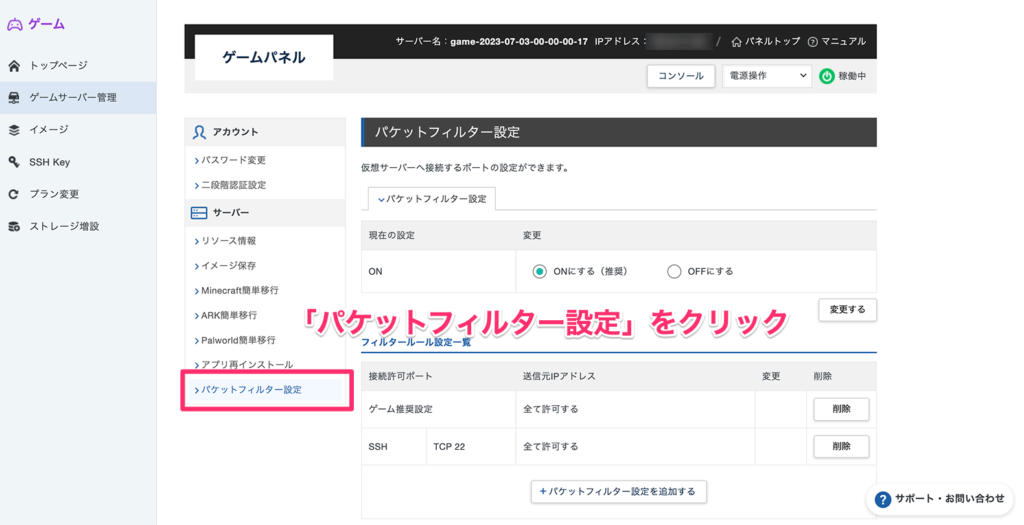
パケットフィルター設定が「ONにする(推奨)」になっていることを確認してください。
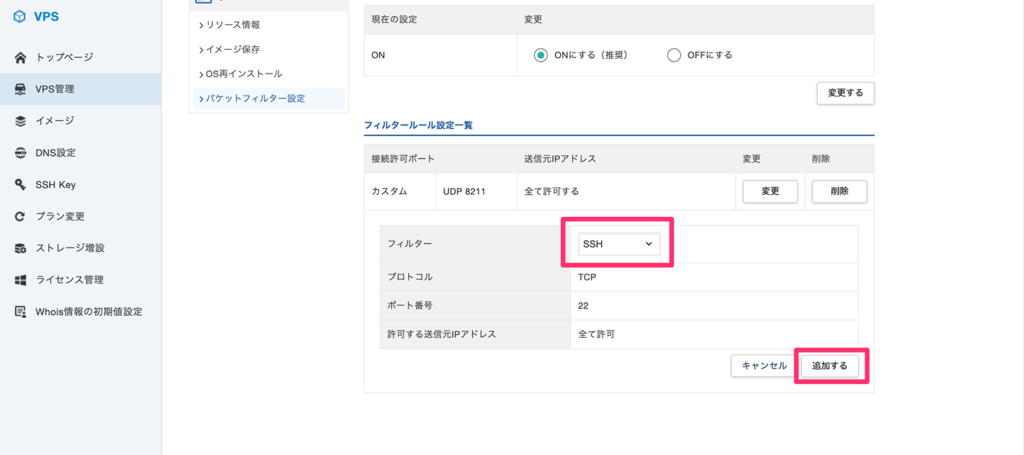
「パケットフィルター設定を追加する」をクリックして「SSH」と「Web」を追加してください。
これでポートの解放設定は完了です。
独自ドメインの設定
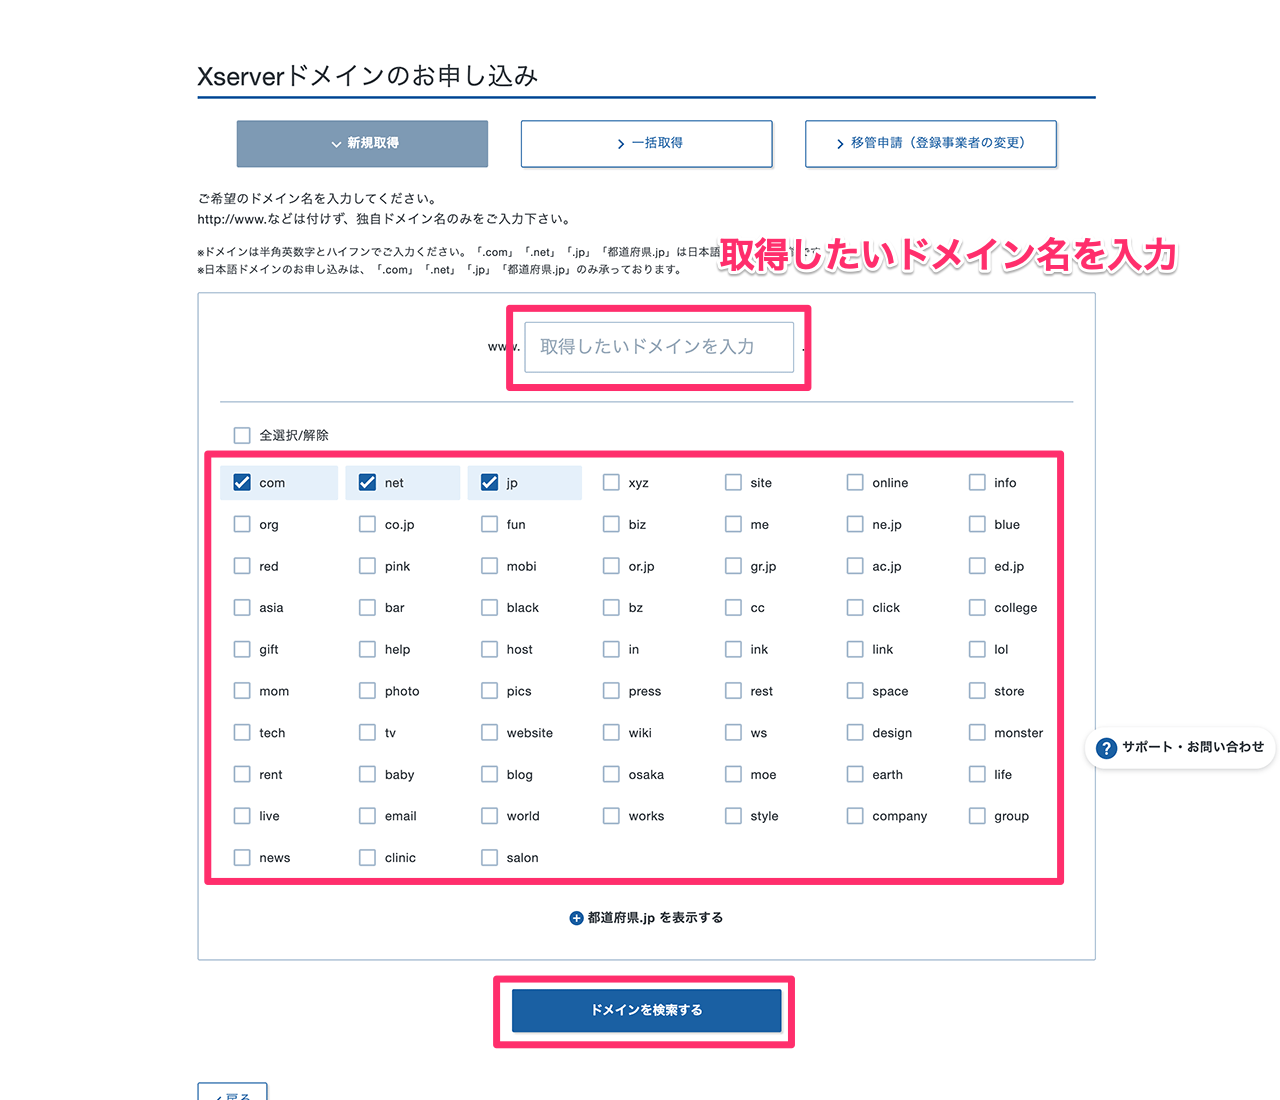
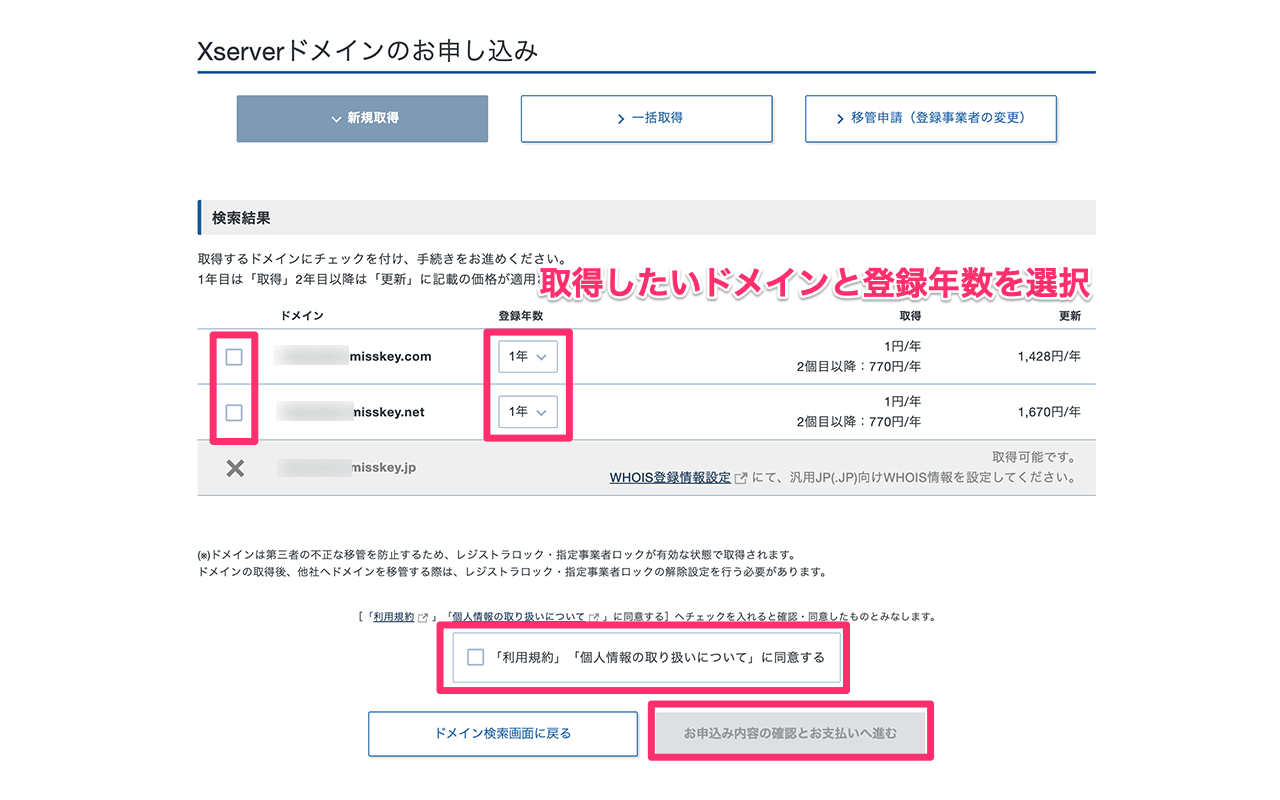
まだ独自ドメインを取得していない方はVPS管理から「ドメイン取得」をクリックしてください。

取得したいドメイン名を入力、希望のドメイン末尾を選択して、「ドメインを検索する」をクリックしてください。
取得可能なドメイン一覧が表示されます。
希望のドメインにチェックを入れ、利用規約に同意して、「お申し込み内容の確認と支払いへ進む」をクリックしてください。
内容を確認して、支払い方法を選択します。
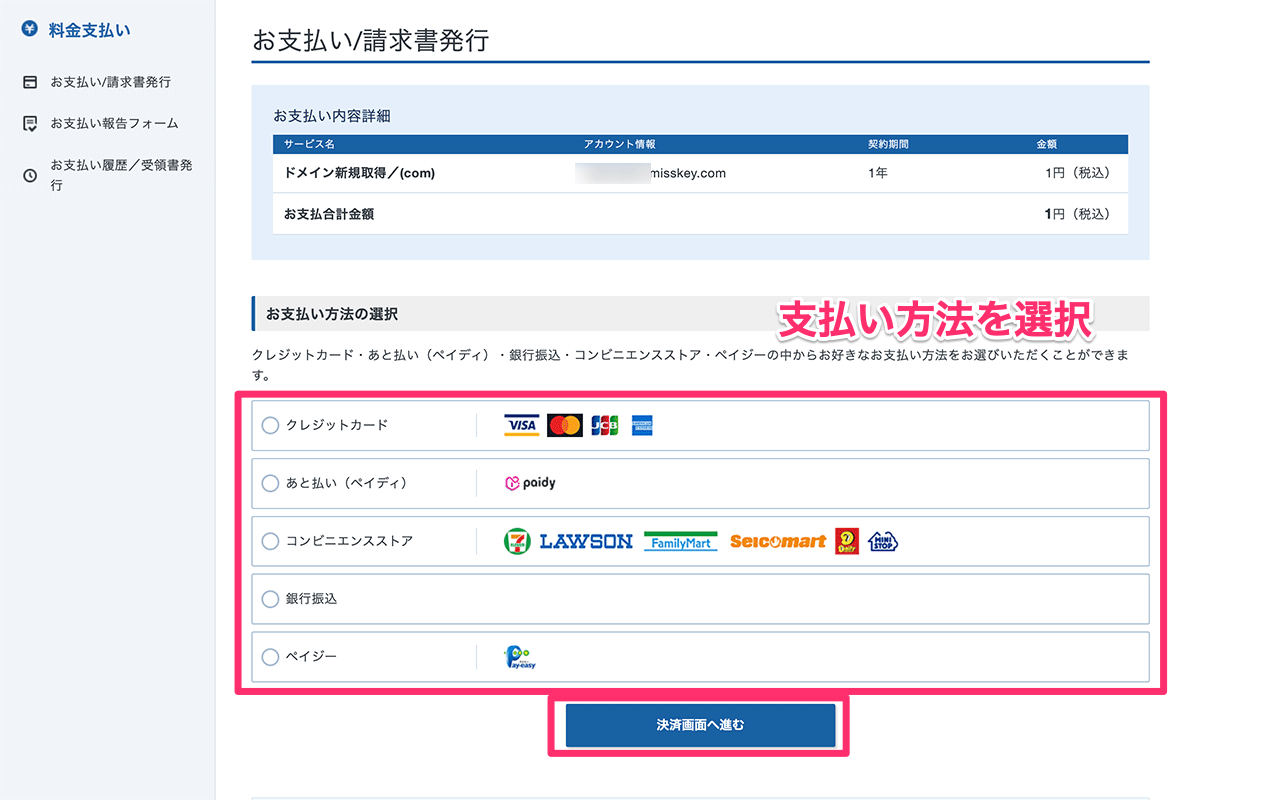
「支払いをする」をクリックしてください。
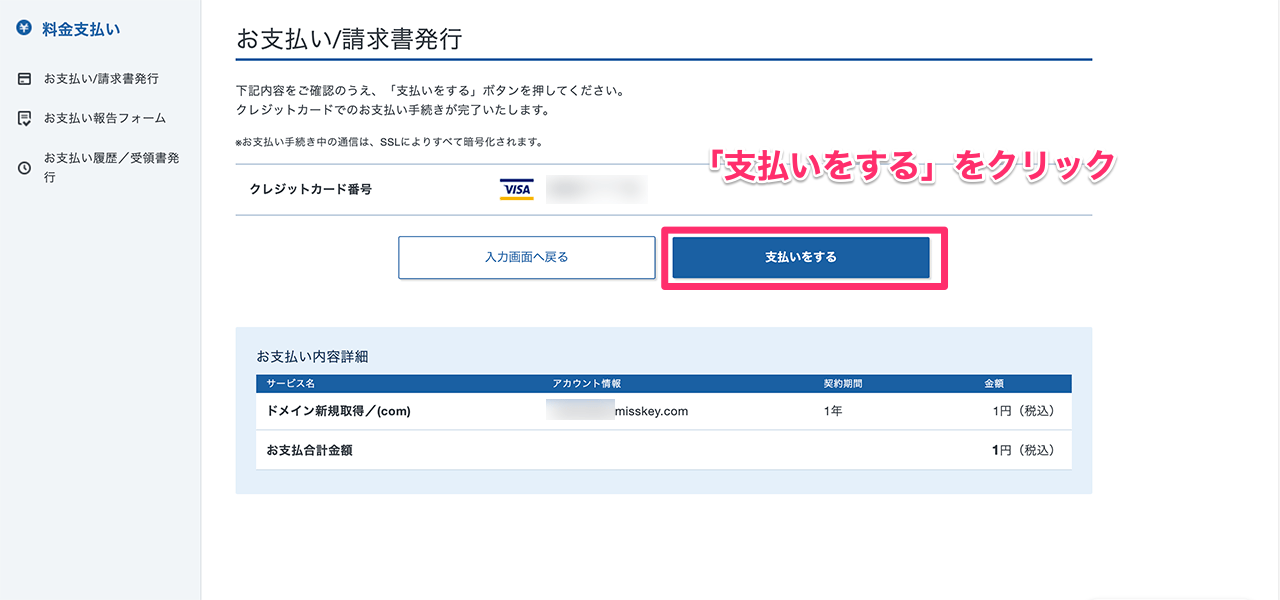
これで独自ドメインが取得できました。

取得した独自ドメインをサーバーと紐つける
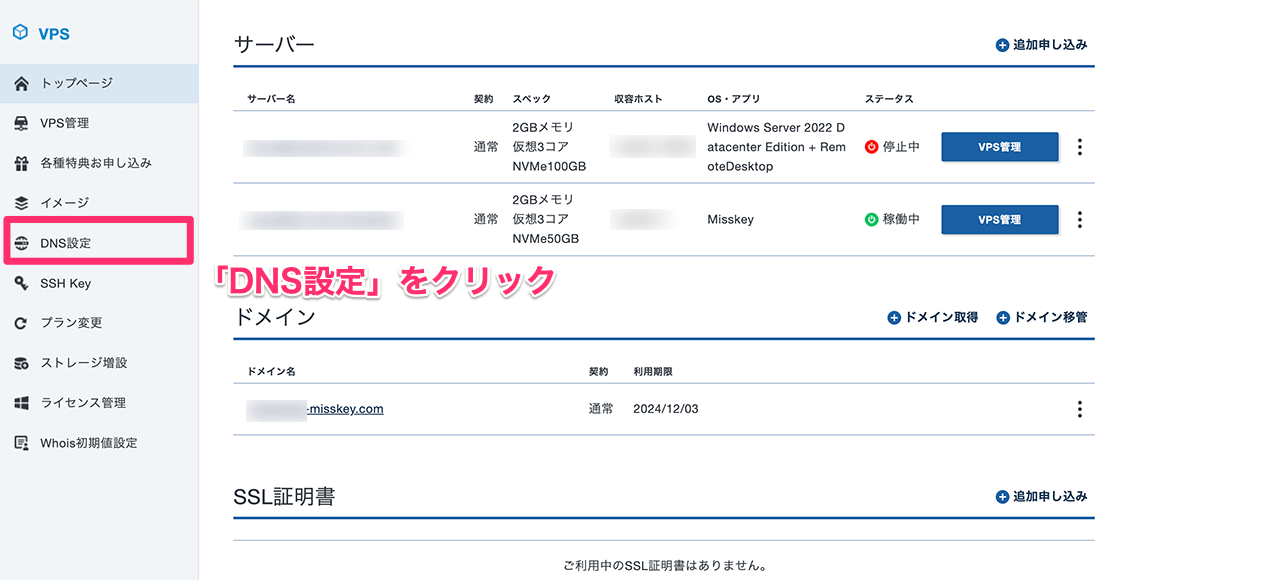
取得した独自ドメインをサーバーと紐つけます。
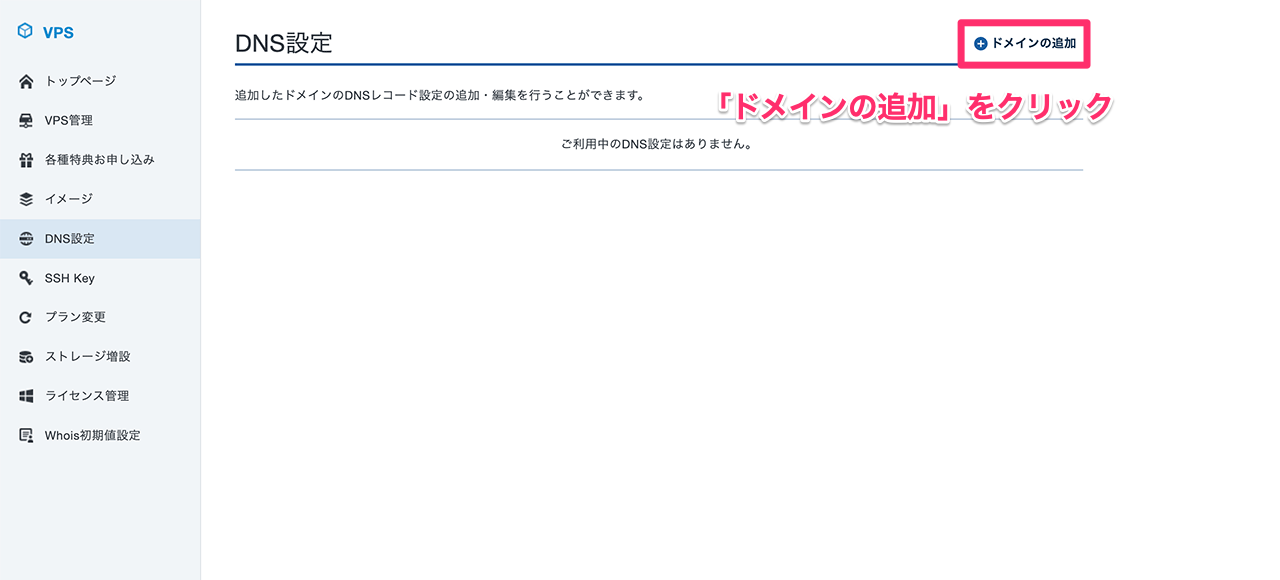
VPS管理画面の「DNS設定」をクリックしてください。
「ドメインの追加」をクリックします。
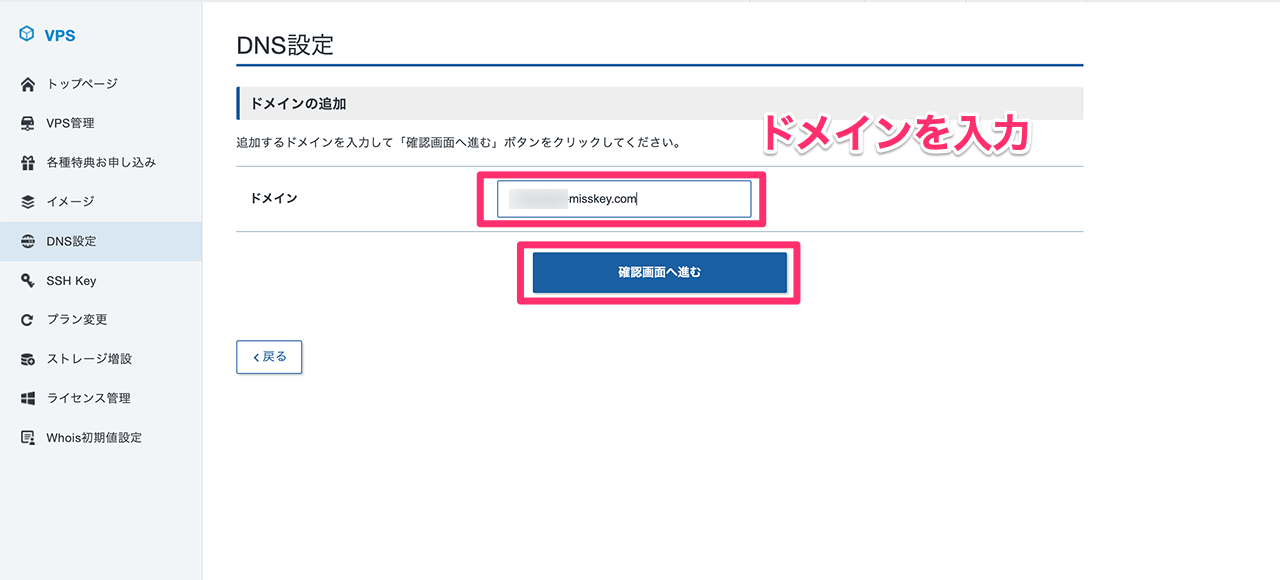
取得したドメインを入力してください。
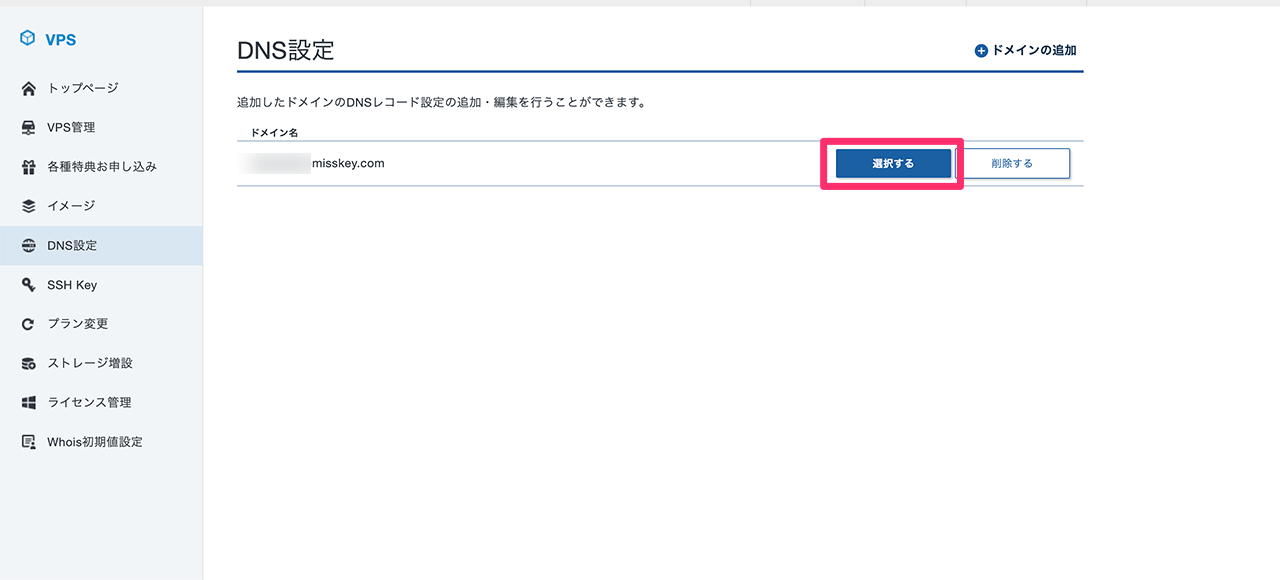
追加したドメイン名の「選択する」をクリックしてください。
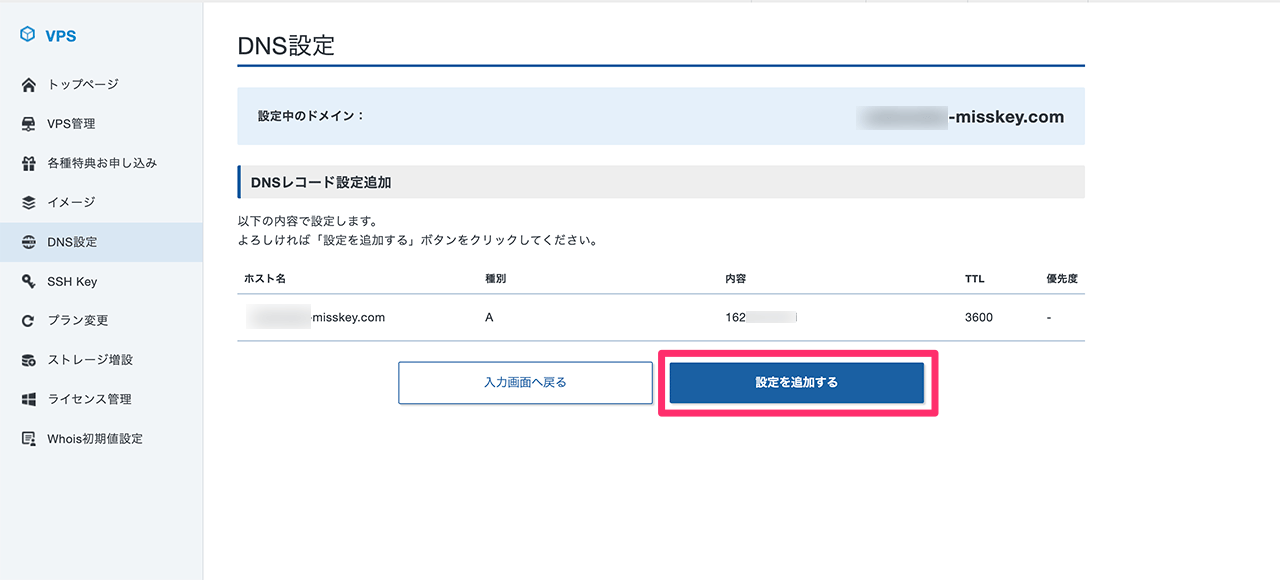
「DNSレコード設定の追加」をクリックします。
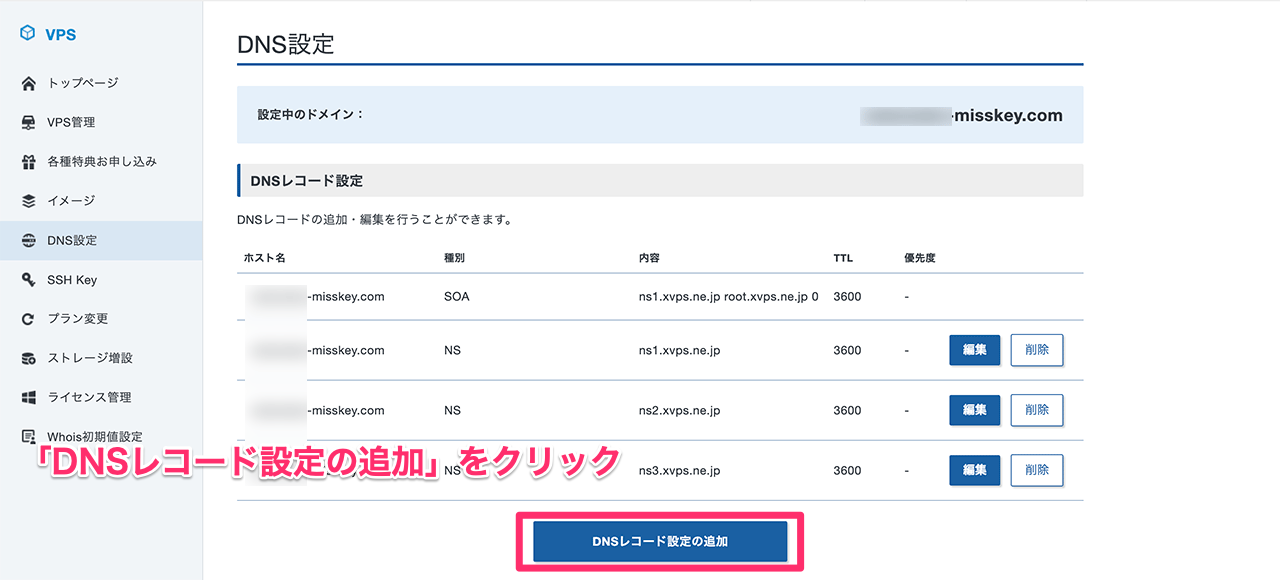
「種別」に「A」を選択し、「内容」にサーバーのIPアドレスを入力してください。

「確認画面へ進む」をクリックします。
DNSレコードは、インターネット上のWebサイトやメールなどのサービスを見つけるための指示書のようなものです。
各Webサイトには、それぞれに割り当てられた一意のIPアドレスがあります。
DNSレコードは、これらのIPアドレスを人が覚えやすいドメイン名(例:www.example.com)に関連付ける役割を持ちます。
つまり、DNSレコードは、特定のドメインがどのIPアドレスに関連付けられているかを示しています。
上記で設定した「A」レコードは「アドレス」の略であり、DNSレコードの最も基本的な種類です。与えられたドメインのIP アドレスを示しています。
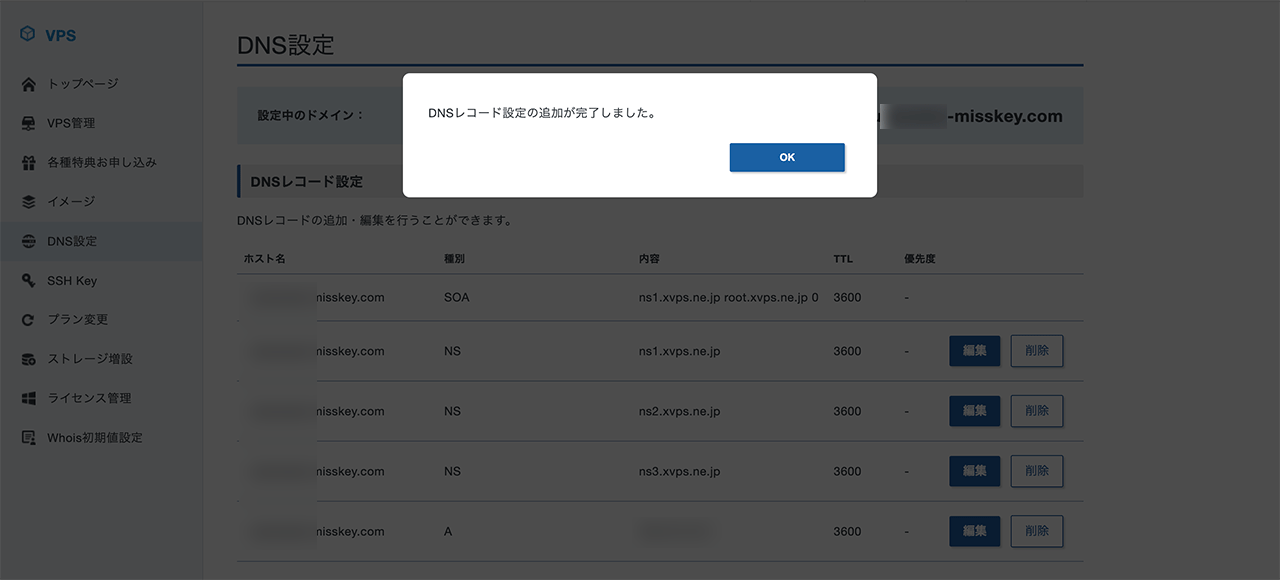
内容を確認して、「設定を追加する」をクリックしてください。
これでDNS設定は完了です。
LEMP環境の設定
アプリイメージを使うと申し込みの時点でOS(Ubuntu)、Nginx、PHP、MySQLのインストールは完了しています。
環境に合わせて設定を変更しておきます。
OSのアップデート
まずはUbuntuをアップデートしておきます。
apt updateapt upgradeNginxの設定
LEMPアプリイメージを使用した場合、Nginxのファイルは以下のディレクトリにあります。
| ファイル | パス |
|---|---|
| Nginx本体 | /usr/sbin/nginx |
| Nginxの設定ファイル | /etc/nginx/sites-enabled/default |
Nginxの設定ファイル/etc/nginx/sites-enabled/defaultを編集していきます。
##
# You should look at the following URL's in order to grasp a solid understanding
# of Nginx configuration files in order to fully unleash the power of Nginx.
# https://www.nginx.com/resources/wiki/start/
# https://www.nginx.com/resources/wiki/start/topics/tutorials/config_pitfalls/
# https://wiki.debian.org/Nginx/DirectoryStructure
#
# In most cases, administrators will remove this file from sites-enabled/ and
# leave it as reference inside of sites-available where it will continue to be
# updated by the nginx packaging team.
#
# This file will automatically load configuration files provided by other
# applications, such as Drupal or WordPress. These applications will be made
# available underneath a path with that package name, such as /drupal8.
#
# Please see /usr/share/doc/nginx-doc/examples/ for more detailed examples.
##

# Default server configuration
#
server {
	listen 80 default_server;
	listen [::]:80 default_server;

	# SSL configuration
	#
	# listen 443 ssl default_server;
	# listen [::]:443 ssl default_server;
	#
	# Note: You should disable gzip for SSL traffic.
	# See: https://bugs.debian.org/773332
	#
	# Read up on ssl_ciphers to ensure a secure configuration.
	# See: https://bugs.debian.org/765782
	#
	# Self signed certs generated by the ssl-cert package
	# Don't use them in a production server!
	#
	# include snippets/snakeoil.conf;

	root /var/www/html;

	# Add index.php to the list if you are using PHP
	index index.php index.html index.htm index.nginx-debian.html;

	server_name subewaka-misskey.com;

	location / {
		# First attempt to serve request as file, then
		# as directory, then fall back to displaying a 404.
		try_files $uri $uri/ =404;
	}

	# pass PHP scripts to FastCGI server
	#
	location ~ \.php$ {
		include snippets/fastcgi-php.conf;
		# With php-fpm (or other unix sockets):
		fastcgi_pass unix:/var/run/php/php8.1-fpm.sock;
		# With php-cgi (or other tcp sockets):
		# fastcgi_pass 127.0.0.1:9000;
	}

	# deny access to .htaccess files, if Apache's document root
	# concurs with nginx's one
	#
	#location ~ /\.ht {
	#	deny all;
	#}
}


# Virtual Host configuration for example.com
#
# You can move that to a different file under sites-available/ and symlink that
# to sites-enabled/ to enable it.
#
#server {
#	listen 80;
#	listen [::]:80;
#
#	server_name example.com;
#
#	root /var/www/example.com;
#	index index.html;
#
#	location / {
#		try_files $uri $uri/ =404;
#	}
#}
上記の設定では、以下の変更をしています。
- 44行目:indexディレクティブに
index.phpを追加 -
ルートディレクトリにアクセスした際にindex.phpを参照するように
- 46行目:server_nameディレクティブにドメイン名を設定
-
対象ドメインからのリクエストに対するルーティング。設定したドメイン名からのリクエストがあった場合に、この設定ファイルでNginxの処理を行うようにする。
- 59行目:
fastcgi_passのコメントアウトを外す -
PHP-FPMの場所を指定。PHPのバージョンは環境に合わせて適宜変更してください。
一度Nginxの設定にエラーがないかテストします。
nginx -ttest is successと表示されれば問題ありません。Nginxを再起動します。
systemctl restart nginx確認のためにドキュメントルート/var/www/htmlにindex.phpを作成し、「Hello World.」と出力してみます。
vi /var/www/html/index.php<?php
echo "Hello World.";
?>ブラウザから独自ドメインにアクセスしてみてください。
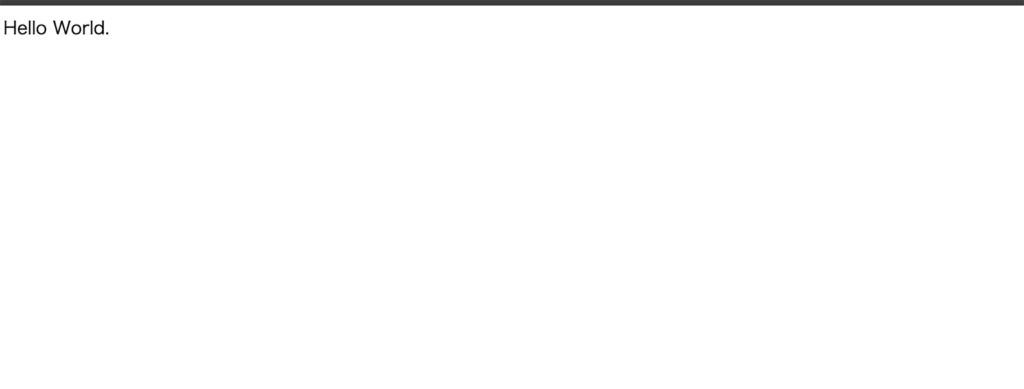
リクエストが正常に処理されていますね。
PHPの設定
PHPの設定はデフォルトのままでも正常に起動しますが、細かいPHPの設定をしたい方はphp.iniから設定しておきましょう。
今回はファイルの最大アップロードサイズを変更しておきます。
vi /etc/php/8.1/fpm/php.iniupload_max_filesize = 20M
post_max_size = 20MSSL設定
SSL化対応もしておきます。
今回はLet’s Encryptの証明書を使用します。
まずは、certbotプログラムをインストールします。
apt install certbotcartbotコマンドを使ってSSL証明書を取得します。
certbot certonly最初に証明書を取得する際の認証方法について聞かれます。
今回は2を選択します。
How would you like to authenticate with the ACME CA?
- - - - - - - - - - - - - - - - - - - - - - - - - - - - - - - - - - - - - - - -
1: Spin up a temporary webserver (standalone)
2: Place files in webroot directory (webroot)
- - - - - - - - - - - - - - - - - - - - - - - - - - - - - - - - - - - - - - - -
Select the appropriate number [1-2] then [enter] (press 'c' to cancel): 2
続いて、認証のためのメールアドレスを入力します。
Enter email address (used for urgent renewal and security notices)
 (Enter 'c' to cancel):
次に利用規約に同意します。
- - - - - - - - - - - - - - - - - - - - - - - - - - - - - - - - - - - - - - - -
Please read the Terms of Service at
https://letsencrypt.org/documents/LE-SA-v1.4-April-3-2024.pdf. You must agree in
order to register with the ACME server. Do you agree?
- - - - - - - - - - - - - - - - - - - - - - - - - - - - - - - - - - - - - - - -
(Y)es/(N)o: Y
次に電子フロンティア財団とメールアドレス共有し、キャンペーン情報などのDMを受け取るか聞かれます。基本的にNoで良いでしょう。
- - - - - - - - - - - - - - - - - - - - - - - - - - - - - - - - - - - - - - - -
Would you be willing, once your first certificate is successfully issued, to
share your email address with the Electronic Frontier Foundation, a founding
partner of the Let's Encrypt project and the non-profit organization that
develops Certbot? We'd like to send you email about our work encrypting the web,
EFF news, campaigns, and ways to support digital freedom.
- - - - - - - - - - - - - - - - - - - - - - - - - - - - - - - - - - - - - - - -
(Y)es/(N)o:N
次にSSL化するドメイン名を聞かれます。
Please enter the domain name(s) you would like on your certificate (comma and/or
space separated) (Enter 'c' to cancel):最後にルートディレクトリを聞かれますので、/var/www/html/と入力します。
Input the webroot for {入力したドメイン名}:(Enter 'c' to cancel): /var/www/html/証明書が取得できると、fullchain.pemとprivate.pemが保存されているパスが表示されますので、どこかにメモしておきましょう。
Successfully received certificate.
Certificate is saved at: /etc/letsencrypt/live/{入力したドメイン名}/fullchain.pem
Key is saved at:         /etc/letsencrypt/live/{入力したドメイン名}/privkey.pem
This certificate expires on 2024-07-04.
These files will be updated when the certificate renews.
Certbot has set up a scheduled task to automatically renew this certificate in the background.

- - - - - - - - - - - - - - - - - - - - - - - - - - - - - - - - - - - - - - - -
If you like Certbot, please consider supporting our work by:
 * Donating to ISRG / Let's Encrypt:   https://letsencrypt.org/donate
 * Donating to EFF:                    https://eff.org/donate-le
- - - - - - - - - - - - - - - - - - - - - - - - - - - - - - - - - - - - - - - -
Nginxの設定ファイルにSSLに関する記述を追加します。
##
# You should look at the following URL's in order to grasp a solid understanding
# of Nginx configuration files in order to fully unleash the power of Nginx.
# https://www.nginx.com/resources/wiki/start/
# https://www.nginx.com/resources/wiki/start/topics/tutorials/config_pitfalls/
# https://wiki.debian.org/Nginx/DirectoryStructure
#
# In most cases, administrators will remove this file from sites-enabled/ and
# leave it as reference inside of sites-available where it will continue to be
# updated by the nginx packaging team.
#
# This file will automatically load configuration files provided by other
# applications, such as Drupal or WordPress. These applications will be made
# available underneath a path with that package name, such as /drupal8.
#
# Please see /usr/share/doc/nginx-doc/examples/ for more detailed examples.
##

# Default server configuration
#
server {
	listen 80 default_server;
	listen [::]:80 default_server;
    server_name subewaka-misskey.com;
    return 301 https://$server_name$request_uri;
}

server {
	# SSL configuration
	#
	listen 443 ssl default_server;
	listen [::]:443 ssl default_server;
	#
	# Note: You should disable gzip for SSL traffic.
	# See: https://bugs.debian.org/773332
	#
	# Read up on ssl_ciphers to ensure a secure configuration.
	# See: https://bugs.debian.org/765782
	#
	# Self signed certs generated by the ssl-cert package
	# Don't use them in a production server!
	#
	# include snippets/snakeoil.conf;

    ssl_certificate /etc/letsencrypt/live/subewaka-misskey.com/fullchain.pem;
    ssl_certificate_key /etc/letsencrypt/live/subewaka-misskey.com/privkey.pem;
    ssl_ciphers ECDHE-ECDSA-AES128-GCM-SHA256:ECDHE-RSA-AES128-GCM-SHA256:ECDHE-ECDSA-AES256-GCM-SHA384:ECDHE-RSA-AES256-GCM-SHA384:DHE-RSA-AES128-GCM-SHA256:DHE-RSA-AES256-GCM-SHA384;
    ssl_session_timeout 1d;
    ssl_session_cache shared:SSL:50m;
    ssl_session_tickets off;

	root /var/www/html;

	# Add index.php to the list if you are using PHP
	index index.php index.html index.htm index.nginx-debian.html;

	server_name subewaka-misskey.com

	location / {
		# First attempt to serve request as file, then
		# as directory, then fall back to displaying a 404.
		try_files $uri $uri/ =404;
	}

	# pass PHP scripts to FastCGI server
	#
	location ~ \.php$ {
		include snippets/fastcgi-php.conf;
		# With php-fpm (or other unix sockets):
		fastcgi_pass unix:/var/run/php/php8.1-fpm.sock;
		# With php-cgi (or other tcp sockets):
		# fastcgi_pass 127.0.0.1:9000;
	}

	# deny access to .htaccess files, if Apache's document root
	# concurs with nginx's one
	#
	#location ~ /\.ht {
	#	deny all;
	#}
}


# Virtual Host configuration for example.com
#
# You can move that to a different file under sites-available/ and symlink that
# to sites-enabled/ to enable it.
#
#server {
#	listen 80;
#	listen [::]:80;
#
#	server_name example.com;
#
#	root /var/www/example.com;
#	index index.html;
#
#	location / {
#		try_files $uri $uri/ =404;
#	}
#}
HTTPをHTTPSにリダイレクトするserverブロックとHTTPSのトラフィックを処理するserverブロックの二つに分けています。
その他の変更点は以下のとおりです。
- 31,32行目:443ポートをリッスンする
-
443番ポート(HTTPSの標準ポート)での接続を待ち受けるように
- 45~50行目:SSLに関する記述
-
fullchain.pemとprivkey.pemへのパスの指定。その他諸々のSSLに関する設定。
これでSSLの設定は完了です。
Nginxを再起動して、https://~のURLでドメインにアクセスして確認してみてください。
systemctl start nginxこれでLEMP環境の構築作業がすべて完了しました。
ローカル環境で開発したアプリケーションがある方はルートディレクトリ配下にアプリケーションファイルをデプロイしてください。
まとめ
今回はXserver VPSを使って、LEMP環境を構築してみました。
アプリイメージを使うとOSやその他のソフトウェアのインストール作業をこちらで行う必要がないため、かなり作業の手間が省けます。
共用レンタルサーバーではシステムを構成を自由に変更できませんが、VPSでは好きな構成にカスタマイズできるので、ぜひ活用してみてください。